Linux VXLAN Configuration
VXLAN extends Layer 2 networks over Layer 3 infrastructure using encapsulation. Each VXLAN segment is identified by a 24-bit VXLAN Network Identifier (VNI), enabling up to 16 million segments. This scalability is ideal for large data centers, allowing isolated and efficient network virtualization across shared physical networks.
Required Linux Modules
root@dent-1:~# lsmod
Module                  Size  Used by
vxlan                  73728  0
ip6_udp_tunnel         16384  1 vxlan
udp_tunnel             20480  1 vxlan
Basic VXLAN configuration
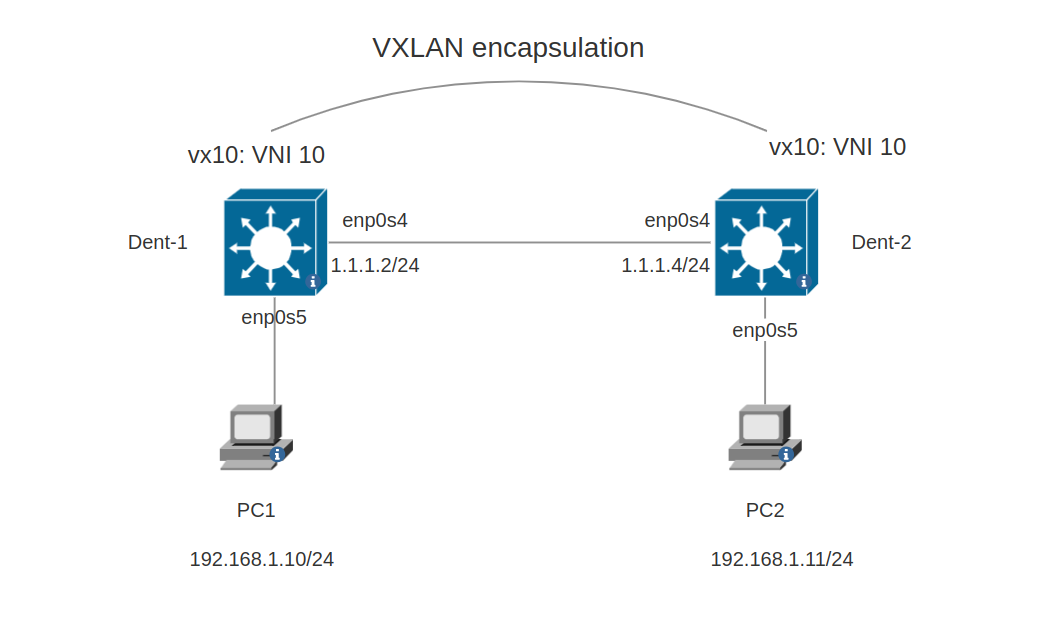
Topology
Configuration
In this example we will go through the configuiration on dent-1 like follows:
- create
brbridge. - config
enp0s4andenp0s5links with proper ip addresses. - create
vx10VXLAN on both sides with1.1.1.2as source and1.1.1.4as destination. - add
vx10andenp0s5(when PC is connected) to bridgeb1.
- ONM-CLI
- IPROUTE2
- NETCONF
dent-1(config-links-iproute2)# link enp0s4
dent-1(config-[name='enp0s4'])# ip 1.1.1.2/24
dent-1(config-[name='enp0s4'])# admin-status up
dent-1(config-[name='enp0s4'])# exit
dent-1(config-links-iproute2)# bridge br1
dent-1(config-[name='br1'])# admin-status up
dent-1(config-[name='br1'])# exit
dent-1(config-links-iproute2)# link enp0s5
dent-1(config-[name='enp0s5'])# master br1
dent-1(config-[name='enp0s5'])# ip 192.168.1.1/24
dent-1(config-[name='enp0s5'])# admin-status up
dent-1(config-[name='enp0s5'])# exit
dent-1(config-links-iproute2)# vxlan vx10
dent-1(config-vxlan[name='vx10'])# master br1
dent-1(config-vxlan[name='vx10'])# vxlan-info id 10
dent-1(config-vxlan[name='vx10'])# vxlan-info local 1.1.1.2
dent-1(config-vxlan[name='vx10'])# vxlan-info remote-or-grp remote-address 1.1.1.4
dent-1(config-vxlan[name='vx10'])# admin-status up
dent-1(config-vxlan[name='vx10'])# commit
ip address add 1.1.1.2/24 dev enp0s4
ip address add 192.168.1.1/24 dev enp0s5
ip link add br1 admin up type bridge
ip link set enp0s5 master br1 up
ip link add name vx10 up master br1 type vxlan id 10 remote 1.1.1.4 local 1.1.1.2
<config>
    <links>
        <bridge>
            <name>br1</name>
            <admin-status>up</admin-status>
        </bridge>
        <link>
            <name>enp0s5</name>
            <admin-status>up</admin-status>
            <master>br1</master>
            <ip>
                <address>192.168.1.1/24</address>
            </ip>
        </link>
        <link>
            <name>enp0s4</name>
            <ip>
                <address>1.1.1.2/24</address>
            </ip>
        </link>
        <vxlan>
            <name>vx10</name>
            <admin-status>up</admin-status>
            <master>br1</master>
            <vxlan-info>
                <id>10</id>
                <remote>1.1.1.4</remote>
                <local>1.1.1.2</local>
            </vxlan-info>
        </vxlan>
    </links>
</config>
Verify
- Now the ping is working between
PC1andPC:
PC1> ping 192.168.1.11 -I 192.168.1.10
PING 192.168.1.11 (192.168.1.11) from 192.168.1.10 : 56(84) bytes of data.
64 bytes from 192.168.1.11: icmp_seq=1 ttl=64 time=1.22 ms
64 bytes from 192.168.1.11: icmp_seq=2 ttl=64 time=1.50 ms
64 bytes from 192.168.1.11: icmp_seq=3 ttl=64 time=3.31 ms
64 bytes from 192.168.1.11: icmp_seq=4 ttl=64 time=2.50 ms
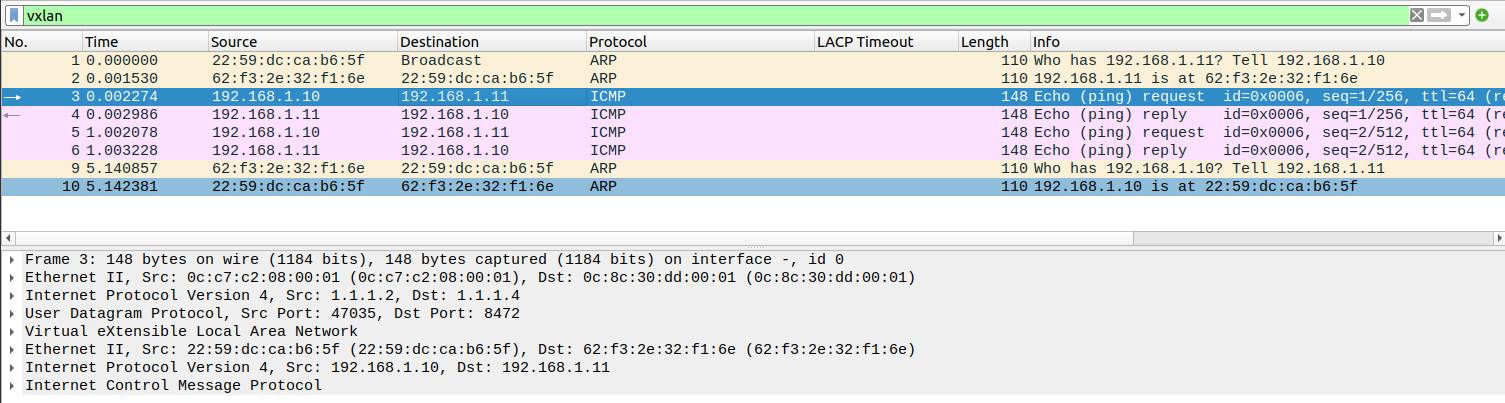
- We can see now that
PC1is able to pingPC2and the traffic is encapsulated with the VXLAN tunnel, the following capture was taken at the link betweendent-1anddent-2:
- We can also verify the
fdbfor the VXLAN using thebridgecommand:
root@dent-1:~# bridge fdb show dev vx10 | grep 62:f3:2e:32:f1:6e
62:f3:2e:32:f1:6e master br1
62:f3:2e:32:f1:6e dst 1.1.1.4 self <--
62:f3:2e:32:f1:6e is the mac address of PC2 connected to dent-2.
VXLAN with VLAN configuration
In the previous example we configured VXLAN on a bridge with no vlan_filtering disabled (no VLANs).
now we will go through the configuration of VXLAN with VLANs where we have two VLANS
that need to be extended by VXLAN over L3 network.
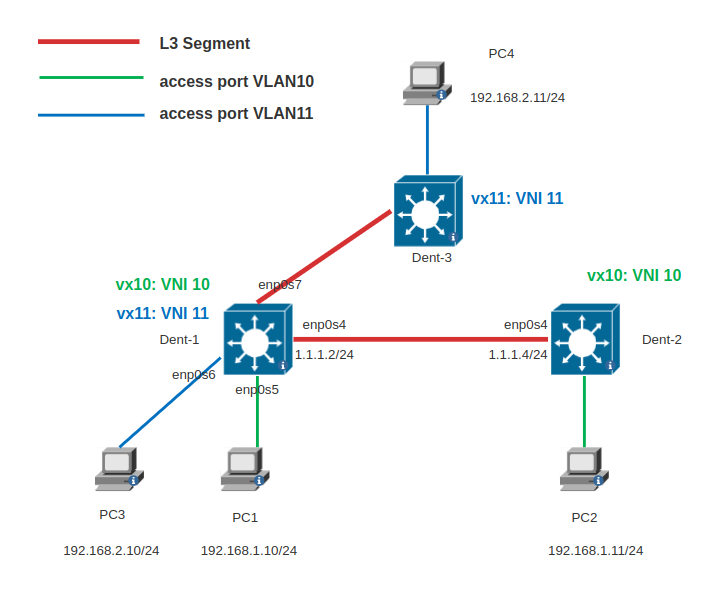
Topology
Configuration
Configuration for dent-1:
- Create bridge
br1withvlan_filteringenabled. - Create VXLAN device
vx10andvx11with required info (src/destination/vni). - Add the physical links
enp0s5andenp0s6to bridgebr1. - Add the VXLAN devices
vx10andvx11to bridgebr1. - Add
VLAN 10toenp0s5andvx10withpvidanduntaggedset (switchport access). - Add
VLAN 11toenp0s6andvx11withpvidanduntaggedset (switchport access).
Configuration for dent-2:
- Create bridge
br1withvlan_filteringdisabled. - Create VXLAN device
vx10with required info (src/destination/vni). - Add the physical links
enp0s5to bridgebr1. - Add the VXLAN devices
vx10to bridgebr1.
Configuration for dent-3:
- Create bridge
br1withvlan_filteringdisabled. - Create VXLAN device
vx11with required info (src/destination/vni). - Add the physical links
enp0s5to bridgebr1. - Add the VXLAN devices
vx11to bridgebr1.
Below is the configuration of dent-1:
- ONM-CLI
- IPROUTE2
- NETCONF
dent-1(config-links-iproute2)# link enp0s4
dent-1(config-[name='enp0s4'])# ip 1.1.1.2/24
dent-1(config-[name='enp0s4'])# admin-status up
dent-1(config-[name='enp0s4'])# exit
dent-1(config-links-iproute2)# link enp0s7
dent-1(config-[name='enp0s7'])# ip 2.2.2.2/24
dent-1(config-[name='enp0s7'])# admin-status up
dent-1(config-[name='enp0s7'])# exit
dent-1(config-links-iproute2)# bridge br1
dent-1(config-[name='br1'])# admin-status up
dent-1(config-[name='br1'])# br-info vlan_filtering 1
dent-1(config-[name='br1'])# exit
dent-1(config-links-iproute2)# link enp0s5
dent-1(config-[name='enp0s5'])# master br1
dent-1(config-[name='enp0s5'])# admin-status up
dent-1(config-[name='enp0s5'])# bridge-conf vlan 10
dent-1(config-[vlan='10'])# pvid true
dent-1(config-[vlan='10'])# untagged true
dent-1(config-[vlan='10'])# exit
dent-1(config-[name='enp0s5'])# exit
dent-1(config-links-iproute2)# link enp0s6
dent-1(config-[name='enp0s6'])# master br1
dent-1(config-[name='enp0s6'])# admin-status up
dent-1(config-[name='enp0s6'])# bridge-conf vlan 11
dent-1(config-[vlan='11'])# pvid true
dent-1(config-[vlan='11'])# untagged true
dent-1(config-[vlan='11'])# exit
dent-1(config-[name='enp0s6'])# exit
dent-1(config-links-iproute2)# vxlan vx10
dent-1(config-vxlan[name='vx10'])# master br1
dent-1(config-vxlan[name='vx10'])# vxlan-info id 10
dent-1(config-vxlan[name='vx10'])# vxlan-info local 1.1.1.2
dent-1(config-vxlan[name='vx10'])# vxlan-info remote-or-grp remote-address 1.1.1.4
dent-1(config-vxlan[name='vx10'])# admin-status up
dent-1(config-vxlan[name='vx10'])# bridge-conf vlan 10
dent-1(config-vxlan[vlan='10'])# pvid true
dent-1(config-vxlan[vlan='10'])# untagged true
dent-1(config-vxlan[vlan='10'])# exit
dent-1(config-vxlan[vlan='10'])# exit
dent-1(config-links-iproute2)# vxlan vx11
dent-1(config-vxlan[name='vx11'])# master br1
dent-1(config-vxlan[name='vx11'])# vxlan-info id 11
dent-1(config-vxlan[name='vx11'])# vxlan-info local 2.2.2.2
dent-1(config-vxlan[name='vx11'])# vxlan-info remote-or-grp remote-address 2.2.2.4
dent-1(config-vxlan[name='vx11'])# admin-status up
dent-1(config-vxlan[name='vx11'])# bridge-conf vlan 11
dent-1(config-vxlan[vlan='11'])# pvid true
dent-1(config-vxlan[vlan='11'])# untagged true
dent-1(config-vxlan[vlan='11'])# commit
ip address add 1.1.1.2/24 dev enp0s4
ip address add 2.2.2.2/24 dev enp0s7
ip link set enp0s4 up
ip link set enp0s7 up
ip link add br1 admin up type bridge vlan_filtering 1
ip link set enp0s5 master br1 up
ip link set enp0s6 master br1 up
ip link add name vx10 up master br1 type vxlan id 10 remote 1.1.1.4 local 1.1.1.2
ip link add name vx11 up master br1 type vxlan id 11 remote 2.2.2.4 local 2.2.2.2
bridge vlan dev enp0s5 vid 10 pvid untagged
bridge vlan dev enp0s6 vid 11 pvid untagged
bridge vlan dev vx10 vid 10 pvid untagged
bridge vlan dev vx11 vid 11 pvid untagged
<config>
    <links xmlns="urn:okda:iproute2:ip:link" xmlns:yang="urn:ietf:params:xml:ns:yang:1">
        <link>
            <name>enp0s4</name>
            <admin-status>up</admin-status>
            <ip>1.1.1.2</ip>>
        </link>
        <link>
            <name>enp0s7</name>
            <admin-status>up</admin-status>
            <ip>2.2.2.2</ip>>
        </link>
        <link>
            <name>enp0s5</name>
            <admin-status>up</admin-status>
            <master>br1</master>
            <bridge-conf>
                <vlan>
                    <vid>10</vid>
                    <pvid>true</pvid>
                    <untagged>true</untagged>
                </vlan>
            </bridge-conf>
        </link>
        <link>
            <name>enp0s6</name>
            <admin-status>up</admin-status>
            <master>br1</master>
            <bridge-conf>
                <vlan>
                    <vid>11</vid>
                    <pvid>true</pvid>
                    <untagged>true</untagged>
                </vlan>
            </bridge-conf>
        </link>
        <vxlan>
            <name>vx10</name>
            <admin-status>up</admin-status>
            <master>br1</master>
            <bridge-conf>
                <vlan>
                    <vid>10</vid>
                    <pvid>true</pvid>
                    <untagged>true</untagged>
                </vlan>
            </bridge-conf>
            <vxlan-info>
                <id>10</id>
                <remote>1.1.1.4</remote>
                <local>1.1.1.2</local>
            </vxlan-info>
        </vxlan>
        <vxlan>
            <name>vx11</name>
            <admin-status>up</admin-status>
            <master>br1</master>
            <bridge-conf>
                <vlan>
                    <vid>11</vid>
                    <pvid>true</pvid>
                    <untagged>true</untagged>
                </vlan>
            </bridge-conf>
            <vxlan-info>
                <id>11</id>
                <remote>2.2.2.4</remote>
                <local>2.2.2.2</local>
            </vxlan-info>
        </vxlan>
    </links>
</config>
After applying this configuration, PC3 can reach to PC4 (vlan11 / VNI 11),
as well as PC1 and PC2 (vlan10 / VNI 10).
To allow connectivity between PC1 and PC3 (different vlan/vni) we need to configure
inter-vlan routing, for more information please refer to VLANs Guide.
VXLAN with Multicast tunnel destination
In this example we will configure VXLAN with multicast group tunnel destination.
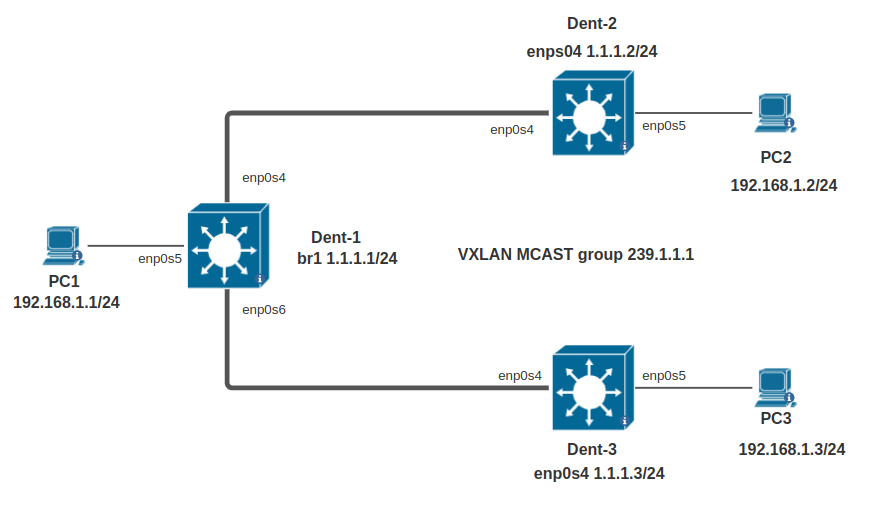
Topology
Configuration
Configuration for dent-1:
- Create bridge
br1. - Creat bridge
br2with ip address1.1.1.1/24 - Create VXLAN device
vx10with source ip ofbr2and destination mcast group 239.1.1.1. - Add the physical links
enp0s4andenp0s6to bridgebr2. - Add the physical link
enp0s5andvx10to bridgebr1.
Configuration for dent-2:
- Create bridge
br1. - Config
enp0s4with ip address1.1.1.2/24. - Create VXLAN device
vx10with source devenp0s4and destination mcast group239.1.1.1. - Add the physical links
enp0s5to bridgebr1. - Add the VXLAN devices
vx10to bridgebr1.
Configuration for dent-3 is similar to dent-2.
Below is the configuration of dent-1:
- ONM-CLI
- IPROUTE2
- NETCONF
dent-1(config-links-iproute2)# bridge br1
dent-1(config-[name='br1'])# admin-status up
dent-1(config-[name='br1'])# exit
dent-1(config-links-iproute2)# bridge br2
dent-1(config-[name='br2'])# admin-status up
dent-1(config-[name='br2'])# ip 1.1.1.1/24
dent-1(config-[name='br2'])# exit
dent-1(config-links-iproute2)# link enp0s4
dent-1(config-[name='enp0s4'])# master br2
dent-1(config-[name='enp0s4'])# admin-status up
dent-1(config-[name='enp0s4'])# exit
dent-1(config-links-iproute2)# link enp0s6
dent-1(config-[name='enp0s6'])# master br2
dent-1(config-[name='enp0s6'])# admin-status up
dent-1(config-[name='enp0s6'])# exit
dent-1(config-links-iproute2)# link enp0s5
dent-1(config-[name='enp0s5'])# master br1
dent-1(config-[name='enp0s5'])# admin-status up
dent-1(config-[name='enp0s5'])# exit
dent-1(config-links-iproute2)# vxlan vx10
dent-1(config-vxlan[name='vx10'])# master br1
dent-1(config-vxlan[name='vx10'])# vxlan-info id 10
dent-1(config-vxlan[name='vx10'])# vxlan-info local 1.1.1.2
dent-1(config-vxlan[name='vx10'])# vxlan-info remote-or-grp mcast-group 239.1.1.1
dent-1(config-vxlan[name='vx10'])# vxlan-info device br1
dent-1(config-vxlan[name='vx10'])# admin-status up
dent-1(config-vxlan[name='vx10'])# commit
ip link add br1 admin up type bridge
ip link add br2 admin up type bridge
ip address add 1.1.1.1/24 dev br2
ip link set enp0s4 up master br2
ip link set enp0s6 up master br2
ip link set enp0s5 master br1 up
ip link add name vx10 up master br1 type vxlan id 10 group 239.1.1.1 dev br1
<config>
    <links xmlns="urn:okda:iproute2:ip:link" xmlns:yang="urn:ietf:params:xml:ns:yang:1">
        <link>
            <name>enp0s4</name>
            <admin-status>up</admin-status>
            <master>br2</master>
        </link>
        <link>
            <name>enp0s6</name>
            <admin-status>up</admin-status>
            <master>br2</master>
        </link>
        <link>
            <name>enp0s5</name>
            <admin-status>up</admin-status>
            <master>br1</master>
        </link>
        <vxlan>
            <name>vx10</name>
            <admin-status>up</admin-status>
            <master>br1</master>
            <vxlan-info>
                <id>10</id>
                <dev>br1</dev>
                <group>239.1.1.1</group>
            </vxlan-info>
        </vxlan>
    </links>
</config>
Verify
Now, PC1 successfully pings both PC2 and PC3.
PC1> ping 192.168.1.2
PING 192.168.1.2 (192.168.1.2) 56(84) bytes of data.
64 bytes from 192.168.1.2: icmp_seq=1 ttl=64 time=2.50 ms
64 bytes from 192.168.1.2: icmp_seq=2 ttl=64 time=2.17 ms
64 bytes from 192.168.1.2: icmp_seq=3 ttl=64 time=2.42 ms
PC1> ping 192.168.1.3
PING 192.168.1.3 (192.168.1.3) 56(84) bytes of data.
64 bytes from 192.168.1.3: icmp_seq=1 ttl=64 time=2.59 ms
64 bytes from 192.168.1.3: icmp_seq=2 ttl=64 time=3.07 ms
64 bytes from 192.168.1.3: icmp_seq=3 ttl=64 time=2.02 ms
We captured traffic between dent-1 and dent-3 while PC1 was pinging PC3.
-
The ARP message is sent to the multicast group
239.1.1.1as observed in the following capture::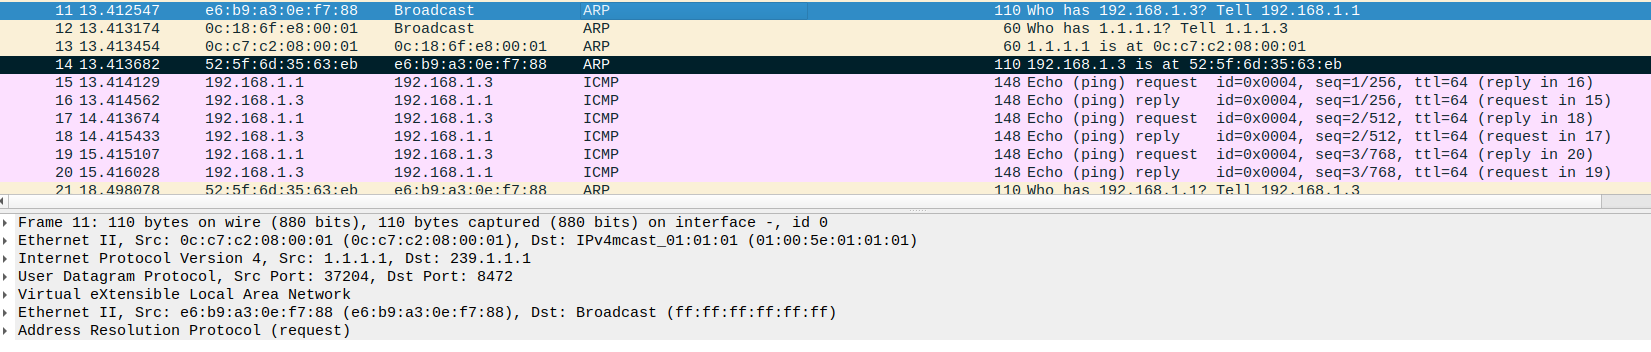
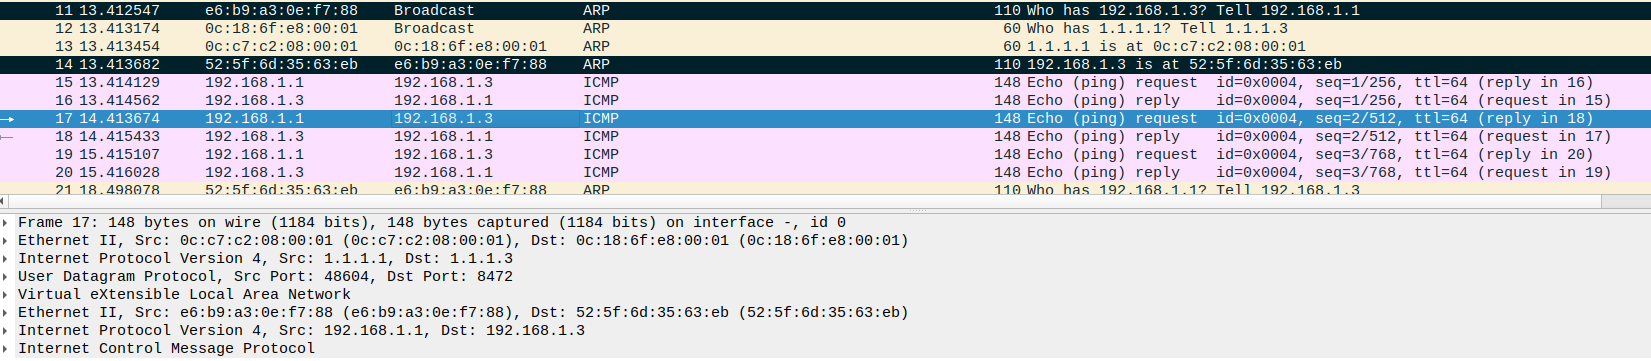
-
Here we can see ICMP packets are sent via unicast after learning the destination MAC address:
By default, VXLAN learning is enabled.
If disabled, ARP and ICMP packets will be sent to multicast 239.1.1.1.
- With Learning Enabled:
dent-1# show operational-data neighbors-iproute2 | begin 52:5f:6d:35:63:eb
fdb ca:90:4d:82:cd:9a vx10
  flags self true
  vxlan-paramters dst 1.1.1.3
- With Learning Disabled:
dent-1# show operational-data neighbors-iproute2 | begin 52:5f:6d:35:63:eb
fdb ca:90:4d:82:cd:9a vx10
  flags self true